Showing the single result
When imaging a sample surface by AFM, it may be difficult to know wether the surface is imaged accurately or if it is affected by a blunt or broken tip. Blunt or broken tips will dramatically distort measurements like surface roughness or feature dimensions. To be certain that a proper AFM tip is used, they must be renewed regularly or checked by SEM imaging; both methods are time consuming and expensive.
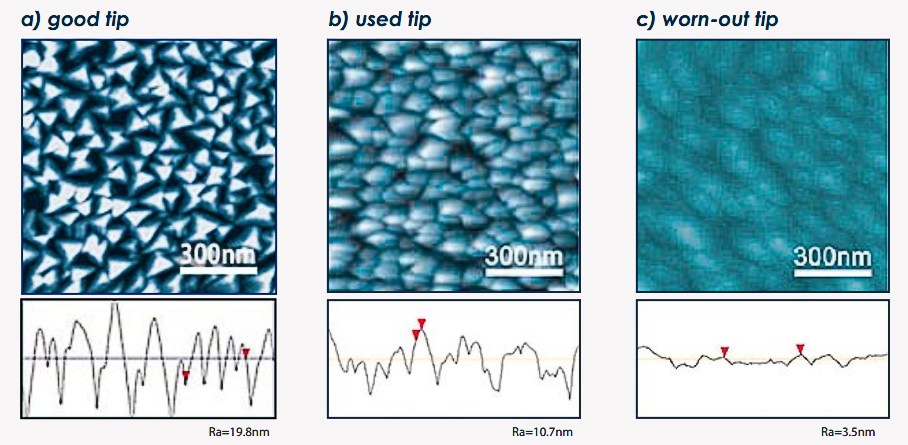
The solution to this is to use the TipCheck sample for quick and convenient determination of the AFM tip condition. A single scan is often enough to clearly show the condition of the AFM tip; Tipcheck offers a quick and easy way to compare and categorize different AFM probes with respect to tip parameters like apex, shape and sharpness.
You can easily check whether the the AFM tip is still good, starts showing wear or is blunt or broken without the need of scanning an entire image or performing an SEM inspection of the tip. Additionally, the TipCheck sample works well with Auto Tip Qualification and Tip Characterisation software currently available on the market.

Comparison between different tip conditions measured with the TipCheck sample. Scan size is 1x1µm for all images; height scale is 100nm.
The TipCheck sample consists of an extremely wear-resistant thin film coating deposited on a silicon chip. The thin film shows a granular, sharply peaked nanostructure which is ideal for reverse imaging of the AFM probe tip apex. The die size of the TipCheck is 5x5mm; it is mounted with electrically conductive epoxy resin on a 12mm metal AFM disc.
